
fixture
# fixture
# 什么是 fixture
本质上就是一个装饰器
# 为什么要使用 fixture
- 前面讲了 setup、teardown 可以实现在执行用例前或结束后加入一些操作,但这种都是针对整个脚本全局生效的
- 如果有以下场景:用例 1 需要先登录,用例 2 不需要登录,用例 3 需要先登录,很显然无法用 setup 和 teardown 来实现了
- fixture 可以自定义测试用例的前置条件
# fixture 优势:
- 命名方式灵活,不局限于 setup 和 teardown 这几个命名
- conftest.py 配置里可以实现数据共享,不需要 import 就能自动找到一些配置
scope=”module”可以实现多个 .py 跨文件共享前置scope=”session”以实现多个 .py 跨文件使用一个 session 来完成多个用例
# fixture 使用
# 定义 fixture
- 可以使用此装饰器(带或不带参数)来定义 fixture 功能
- fixture 功能的名称可以在以后使用引用它会在运行测试之前调用它
@pytest.fixture(scope="function", params=None, autouse=False, ids=None, name=None)
1
参数说明:
| 参数 | 说明 |
|---|---|
| scope | fixture 的作用域 默认 function,还有其他三个级别:class、module、package/session |
| params | fixture 的参数化 |
| autouse | 默认 False 设置为 True 开启自动使用 fixture 功能 |
| ids | 配合 params 使用 |
| name | 设置 fixture 函数的别名,调用时可以使用别名调用 |
# 如何调用 fixture
调用 fixture 方式
- 将 fixture 名称作为测试用例函数的输入参数
- 测试用例加上装饰器:
@pytest.mark.usefixtures(fixture_name) - fixture 设置
autouse=True
import pytest

@pytest.fixture
def open():
    print("打开浏览器")

# 使用方式一
def test_001(open):
    print("执行测试用例1")

def test_005(login,open):
    print("执行测试用例5")

# 使用方式三
@pytest.fixture(autouse=True)
def sql():
    print("先打开数据库")

# 使用方式二:
@pytest.fixture
def login():
    print("先进行登录")

@pytest.mark.usefixtures("open")
@pytest.mark.usefixtures("login")
class Test_Case():
    def test_002(self):
        print("执行测试用例2")

    def test_003(self):
        print("执行测试用例3")


def test_004():
    print("执行用例004")

if __name__ == '__main__':
    pytest.main(["-s","-v"])
1
2
3
4
5
6
7
8
9
10
11
12
13
14
15
16
17
18
19
20
21
22
23
24
25
26
27
28
29
30
31
32
33
34
35
36
37
38
39
2
3
4
5
6
7
8
9
10
11
12
13
14
15
16
17
18
19
20
21
22
23
24
25
26
27
28
29
30
31
32
33
34
35
36
37
38
39
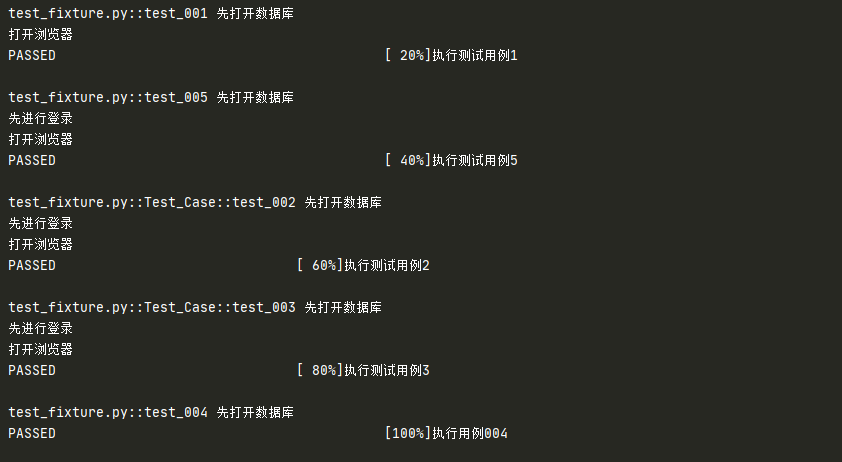
测试结果:
总结
- 在类声明上面加
@pytest.mark.usefixtures(),代表这个类里面所有测试用例都会调用该 fixture - 可以叠加多个
@pytest.mark.usefixtures(),先执行的放底层,后执行的放上层 - 可以传多个 fixture 参数,先执行的放前面,后执行的放后面
- 如果 fixture 有返回值,用
@pytest.mark.usefixtures()是无法获取到返回值的,必须用传参的方式(方式一) - 自动使用(
autouse=True)的 fixture 将在显式使用(传参或装饰器)的 fixture 之前实例化
# fixture 实例化顺序
高级别 scope 的 fixture 在低级别 scope 的 fixture 之前实例化(session > package > module > class > function)
具有相同 scope 的 fixture 遵循测试函数中声明的顺序
遵循 fixture 之间的依赖关系(在
fixture_A里面依赖的fixture_B优先实例化,然后到fixture_A实例化)
  import pytest

  order = []

  @pytest.fixture(scope="session")
  def s1():
      order.append("s1")

  @pytest.fixture(scope="session")
  def s2():
      order.append("s2")

  @pytest.fixture(scope="session")
  def s3():
      order.append("s3")

  @pytest.fixture(scope="session")
  def s4():
      order.append("s4")

  @pytest.fixture(scope="session")
  def s5(s7):
      order.append("s5")

  @pytest.fixture(scope="session")
  def s6():
      order.append("s6")

  @pytest.fixture(scope="session")
  def s7():
      order.append("s7")

  @pytest.fixture(scope="module")
  def m1():
      order.append("m1")

  @pytest.fixture(scope="module")
  def m2(s5):
      order.append("m2")

  @pytest.fixture(scope="module")
  def m3(s4):
      order.append("m3")

  @pytest.fixture
  def f1(s2, f3):
      order.append("f1")

  @pytest.fixture
  def f2(m2, s3):
      order.append("f2")

  @pytest.fixture
  def f3(s6):
      order.append("f3")

  def test_order(f2, f1, m3, m1, s1):
      print(order) # ['s1', 's3', 's2', 's4', 's7', 's5', 's6', 'm3', 'm1', 'm2', 'f2', 'f3', 'f1']


  if __name__ == '__main__':
      pytest.main(["-s","-v"])
1
2
3
4
5
6
7
8
9
10
11
12
13
14
15
16
17
18
19
20
21
22
23
24
25
26
27
28
29
30
31
32
33
34
35
36
37
38
39
40
41
42
43
44
45
46
47
48
49
50
51
52
53
54
55
56
57
58
59
60
61
62
2
3
4
5
6
7
8
9
10
11
12
13
14
15
16
17
18
19
20
21
22
23
24
25
26
27
28
29
30
31
32
33
34
35
36
37
38
39
40
41
42
43
44
45
46
47
48
49
50
51
52
53
54
55
56
57
58
59
60
61
62
测试结果:

注意:
添加了 @pytest.fixture ,如果 fixture 还想依赖其他 fixture,需要用函数传参的方式,不能用 @pytest.mark.usefixtures() 的方式,否则会不生效
如上述例子中的 s5
# fixture 实现 teardown
前面讲的 fixture 都是实现的 setup
# yield
fixture 实现 teardown 需要使用 yield
import pytest

@pytest.fixture(scope="module",autouse=True)
def login():
    print("打开浏览器")
    yield
    print("关闭浏览器")


@pytest.fixture
def sql():
    print("连接数据库")
    yield
    print("关闭数据库")

def test_001(sql):
    print("执行用例01")

def test_002(sql):
    print("执行用例02")

def test_003():
    print("执行用例03")

if __name__ == '__main__':
    pytest.main(["-s","-v"])
1
2
3
4
5
6
7
8
9
10
11
12
13
14
15
16
17
18
19
20
21
22
23
24
25
26
2
3
4
5
6
7
8
9
10
11
12
13
14
15
16
17
18
19
20
21
22
23
24
25
26
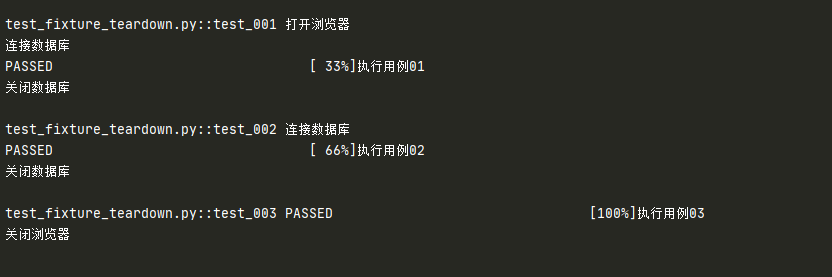
测试结果:
注意
- 如果 yield 前面的代码,即 setup 部分已经抛出异常了,则不会执行 yield 后面的 teardown 内容
- 如果测试用例抛出异常,yield 后面的 teardown 内容还是会正常执行
# yield + with
yield 也可以配合 with 语句使用
官方例子:
@pytest.fixture(scope="module")
def smtp():
    with smtplib.SMTP("smtp.gmail.com") as smtp:
        yield smtp  # provide the fixture value
1
2
3
4
5
2
3
4
5
# addfinalizer
Pytest 中做 teardown 的处理,除了使用带有 yield 的 fixture 函数,还可以在 request-context 对象中注册 addfinalizer 方法实现终结函数
# 注册单个 request.addfinalizer
@pytest.fixture
def sql(request):
    print("连接数据库")
    def close():
        print("关闭数据库")
    # 注册 close 为终结函数
    request.addfinalizer(close)

def test_01(sql):
    print("执行用例01")

def test_02(sql):
    print("执行用例02")
1
2
3
4
5
6
7
8
9
10
11
12
13
2
3
4
5
6
7
8
9
10
11
12
13
测试结果:

效果上与 yield 一致
# 注册多个 request.addfinalizer
@pytest.fixture
def sql(request):
    print("登录成功")
    print("连接数据库")
    def logout():
        print("注销登录")
    def close():
        print("关闭数据库")
    # 注册 close 为终结函数
    request.addfinalizer(logout)
    request.addfinalizer(close)

def test_01(sql):
    print("执行用例01")

def test_02(sql):
    print("执行用例02")
1
2
3
4
5
6
7
8
9
10
11
12
13
14
15
16
17
2
3
4
5
6
7
8
9
10
11
12
13
14
15
16
17
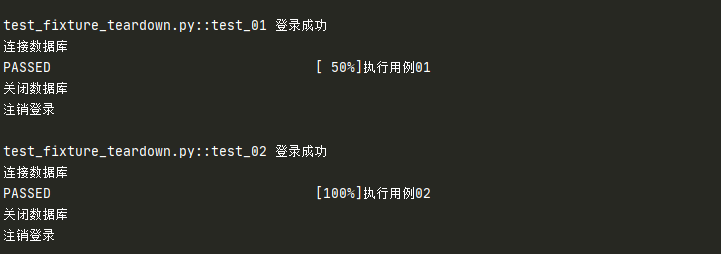
测试结果:
注意
- 如果
request.addfinalizer()前面的代码,即 setup 部分已经抛出异常了,则不会执行request.addfinalizer()的 teardown 内容(和 yield 相似,应该是最近新版本改成一致了) - 可以声明多个终结函数并调用
- 多个终结器的情况下,执行的顺序是与注册时候相反的
# 参考资料
官方文档-关于 fixture (opens new window)
官方文档-如何使用 fixture (opens new window)
(完)